Manufacturers
Categories
Information
More Information
Important Links
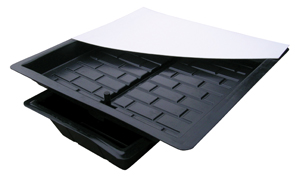
Ebb and Flood
Ebb and Flood is so successful because it gives great opportunity to vary the watering (and hence
nutrition) cycle. Unlike most other hydroponic systems the roots of your plants are not, in most cases,
immediately visible so it is most important to understand what is happening so the correct decision on
operating the system is made.
In Ebb and Flood the growing medium is periodically flooded. During this process any residue of the
previous flood will be redissolved in the nutrient solution so that the nutrient solution remaining in the
medium after the drain (ebb) does not become stale, precipitated or over concentrated (if you try
growing a plant in any ordinary pot this is the reason why performance is so often disappointing).
Also, because all the free draining moisture is removed from the root area on the ebb, vast amounts of
air which of course contains essential oxygen is drawn in around the roots. This invigorates the roots and
encourages their best performance in terms of growth, water uptake and nutrient uptake.
It's one of the great advantages of Ebb & Flood that almost any plant can be transferred at any time. Also
it is possible to germinate seeds directly in a Ebb & Flood system so no transplanting is ever necessary.
Don't waste your time with unhealthy plants. To get really good results always start off with a healthy
pest free plant.
In an ebb and flood system, the plants are placed in a box that is periodically pumped full of nutrient solution. The substrate soaks up the nutrient solution, which is then pumped away. By filling the box with nutrient solution the old air is pushed out as the solution is pumped away and fresh air flows into the medium. In order to prevent oxygen shortages from occurring around the roots, the medium must not be saturated for too long with water and it must contain sufficient air when the nutrient solution has drained away. One guideline for this is to ensure that the process of pumping full and then emptying should take no longer than 30 minutes. The recommended frequency for flooding depends on the substrate that is being used and each plant’s root volume. Clay pebbles retain little water and must be flooded more often than a system with rock wool, for example, which will hold more water.
Using Clay Pebbles
or planter. Although it is commonly done it is not
necessary to wash the pebbles of dust prior to use.
Place a inch or so (2.5cm) of pebbles on the base of
the table/planter. Before setting out your plants in
their final position gently ease out the roots from
the propagation block so they can quickly
penetrate through the pebbles. With strongly root
bound plants some considerable force may be
required to pull the roots apart. Wash away loose
unnecessary compost.
Now place the plants in their final positions and fill
table/planter with pebbles and finish so as to
effect a pleasing look.
medium overall.
If the table/planter is not going to be packed
tightly with pots or buckets it is necessary to
obtain a completely non transparent cover for the
table/planter so that light is excluded from the
nutrient solution. If using a cover mark the
position of the pots on the cover and cut out
spaces for each pot.
Place cover in position and place the pots through
so that they rest on the bottom of the table. It is
common to lay an inch or so (2.5cm) of pebbles in
the bottom of the table prior to placing pots this
encourages draining from the bottom of each pot.
An alternative to a pot/bucket is the .
'HUGO' block which is used excactly like you would
use a pot/bucket. Removing the plastic sleeve is
optional depending on how you use it.
Using Rockwool
plants. Transplants will already be in the rockwool
block.
Obtain a completely non transparent cover for the
table and mark on the position of plants on the
cover. Cut out spaces but retain cut outs.
Fix cover in position. Remove outer plastic
wrapping (if any) from the rockwool ( )
cube and place cube through cut outs so cubes rest
on base of table.
Cut a hole in the centre of the retained "cut-outs”
and fit them gently round the stem of the
transplant. This will prevent light getting to the
root system.
Remove the plastic sleeve from around the .
cube before transplanting. This allows an
unlimited supply of oxygen to get to your plant
roots.
Sowing Direct
pebble for the top 1/2" (1.5cm) if using small seed.
Obtain a completely non transparent cover for the
table (a polythene sheet will do nicely).
Scatter seeds onto the pebbles, wet the pebbles
(and seeds) either using a watering can or by
flooding the table, place cover over the table.
Each day raise the cover to check if seeds have
germinated. As soon as they show remove the
cover. Do not allow seedlings to dry out. It may be
necessary to water with a watering can. Later
when the seedlings have developed they can be
grown on just as in the first method.
To get the best of your Ebb and Flood you need to choose how often to flood the system and when the
floods should be made. Certain obvious factors affecting your decision making are given below.
- Young plants need fewer 'ON' periods than older plants because they use less water.
- Hydrophobic plants need fewer 'ON' periods than hydrophillic plants.
- During cold or dull conditions fewer 'ON' periods are required. Accordingly more 'ON' periods are needed in summer than in autumn or spring.
- 'ON' periods should be slightly gathered towards the hottest part of the day. Do not make 'ON' periods longer but shorten the 'OFF' periods.
- Expanded clay pebbles need more 'ON' periods than stonewool medium. Other mediums may require more or fewer 'ON' periods depending on their water retaining qualities.
- Plants under stress, on whatever count, need fewer 'ON' periods. Just one per day or every other day may be sufficient in severe cases.
How Many Floods to Start?
a. Using clay pebbles filling the table.Here a considerable amount of nutrient solution is held in the clay pebbles so at first only 1 or 2 floods per day is all that is required.
b. Using clay pebbles, cubes or other medium in large pots or buckets. When using clay pebbles or other free draining medium the smaller volume used allows more floods. Try 2 or 3 to start. If using moisture retentive medium such as grow cubes 1 flood to start is enough.
c. Using Rockwool or other moisture retentive medium. This is a difficult one. Use 1 flood at first. But be ready to go up in number as soon as roots emerge from the block (see later).
d. Raising seedlings. At first one flood is enough.
When Do I Flood?
Easy, at the start of the day and in the middle of the day.
Plant Development
In all cases as plants grow they use more water providing an opportunity and indeed a need to flood more frequently. Space additional floods more or less evenly throughout the day but slightly grouping floods to the hottest part of the day and leaving at least 1 hour between the last flood and the end of the day time.
If you set the perfect number of floods your water consumption is maximised and your results are spectacular. The keen Ebb & Flood grower always records the amount of water needed to top-up his system each day. This is his best guide to number of floods.
Advanced Systems
Ebb and Flood systems are usually very tolerant of the operation but especially if using a water retentive medium it is very difficult to set a flood time using an ordinary segmental timer which does not drown the plant. The answer is to use a Timing Modifying Unit which allows the signal from a ordinary segmental (15min) timer switch to be modified to run for a few minutes (usually 1-10 mins).
Using a TMU very short floods are possible. During these floods only the bottom of the root is flooded and the solution quickly drains away. Using this instrument it is possible to have more but shorter flood and drain periods in any day.
Maintenance
1. Determine the pH of the nutrient/water mix in your collection tank using an approved test kit.
2. Determine the pH you wish to run your Ebb and Flood system. Most authorities recommended between pH 5.8 and 6.5.
3. If the pH of the solution is in the correct range do nothing.
4. If the pH of the solution is above the correct range add phosphoric acid (ph down).
5. If the pH is below the correct range add potassium hydroxide (pH up)
Tips
Phosphoric acid and potassium hydroxide are very dense chemicals which do not mix readily with water. To improve mixing so as to get the best results from your pH test kit add phosphoric acid or potassium hydroxide very sparingly to a glass of warm water stirring vigorously before adding it to the nutrient solution. Once in the solution stir vigorously again, or allow ample circulation of the
nutrient (say over 1 hour) before retesting pH.
It is very easy to overdose with either chemical. It is not critical for your plants that the pH should always be in the determined range, while overdosing is always very harmful so go easy and use either chemical very sparingly. Be satisfied to adjust pH to your chosen level over several days.
Take a note of the amount of phosphoric acid used to adjust your first tank of nutrient solution it will make it much easier when you need to do it again at solution changes. Avoid large changes in either pH or nutrient strength and do not let the solution level in your
tank drop significantly. On larger systems an automatic top-up device can be fitted to prevent this happening.
If you are monitoring your solution strength using a conductivity meter always top-up the tank with water to it's maximum level about 1 hour before testing for nutrient strength. This will ensure an accurate reading.
Never fill your tank above the base of your table.
If you are using the "top-up" method of nutrition (dose rates will be given on your nutrient pack) it is especially convenient to make-up a large container of nutrient solution so you can draw off just sufficient to top-up the tank on a regular basis, say every day or so.
Check and adjust the pH of the solution as necessary. In soft water areas very little adjustment (if any) will be needed but in hard water areas (and especially if using ) there will be a tendency for the pH to rise gradually after you have previously adjusted it down to the correct level. Do not be alarmed by this. Do not be tempted to add extra acid. As necessary simply adjust pH down to preferred level.